Monday 17 February 2014

Photoshop (DVD Cover)

Photoshop

Firstly create a new file within Photoshop to the correct dimensions to suit a DVD cover...


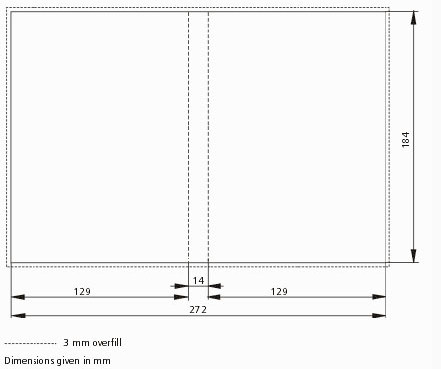
Now we have the base template for our cover.

Basic Tools

Move tool: Use this to move selected areas to different locations.


Marquee tool: Use this to select a rectangle, elliptical or single row/column. The single row/column option is great for using within a website. The browser will use the single row and duplicate it over and over to fill the webpage thus using far less bandwidth when rendering the page.


Lasso tool: Use this to create a closed shape, after the last click it will automatically close itself.


Quick selection tool; This is a very handy tool for selecting large areas of an image that differ in colour. For example if you wanted to select a person without the background, it detects the change in colour and makes it really easy to do.


Crop tool: use this to crop your images, create a rectangle around the area that you would like to keep and select it, all surrounding areas will be deleted.


Eyedropper tool: Use this to select an existing colour from the canvas.


Layers

Layers are very important to organise and overlap images appropriately to create a good finished image.

Each layer can be selected so that only the image/s within are worked on. The layers are organised from top to bottom, top being shown on top of the others and so forth as you go down the list.


This is a very good tool when creating images that incorporate several images that overlap one another.
Also a good idea is to cut the back information from an existing DVD to copy onto your own.

Masking

Each layer can have a mask property added to it. Paint can be added to a mask to make it more or less transparent thus showing the layer underneath to varying degrees. Adding black to a part of a layers mask will make it transparent. Adding white will make it reappear. Adding grey to a mask will make it partially transparent.

...I have decided to base my promotional video loosely around the Karate Kid and Robocop. This I will post in week twelve.

Next week...more Photoshop (and a promo-vid teaser).

Thursday 13 February 2014

Production Processes

Brief Video Production Process

This process can be broken down into several parts to make it easier to distinguish what you should be doing at each stage of the process. See the following diagram:

As you can see, there is an obvious increase in the effect to the finished product if you decide to change it towards the end of the project. And a far more creative outcome is achievable if more time is spent on the planning stages at start of the project. By saying this I don't mean that the concept phase is the most important, but the more time spent within the earlier planning stages will result in the best outcome.

Here is a simple system to follow: 

  1. Generate some ideas
  2. Test the ideas (show a few friends and gauge their reactions)
  3. Evaluate the results. 
  4. If good results are achieved then you can move onto the next stage, back to number one.
Try to describe the look and feel of the final video, firstly in your imagination, and then put it on paper (sometimes a good idea isn't so great in reality). Make a storyboard and write some scripts, if you have a good idea for a scene make sure to take a note of it somewhere, even if it isn't used in the final production it could be used on your next. 

Remember planning goes a long way in the production of a film. The worst thing is to get to the post production process of using Adobe after effects and Encore (we will go into later in this blog), and thinking,"I wish I had done that differently". By then it is too late.

Next week...Photoshop


Monday 3 February 2014

03/02/14 Introduction

Within this blog I intend to give you the readers, a walk through of my first Digital Imaging Software university project. The project is to create a one minute long promotion video of a chosen subject, and to produce the dvd cover, and a disc label. Along the way I will be giving detailed guidance to all the programs and techniques that I use.

I will think about the criteria of the project and decide about an interesting and amusing subject by next week.

Ideas I have had...

A one minute long video packed full of Karl Pilkingtons most funny quotes.
A  'mash up' video combining South Park, The Simpsons and Family Guy interacting with each other.

Firstly here is a little theory behind colours and file formats...

Colours

  • Two different colour models...
RGB (red-green-blue)
CMYK (cyan magenta yellow key (key controls the saturation of the colours)


  • When designing pages for the internet take into account 'web safe' colours...
Netscape introduced a fixed color palette of 216 colors that will be used on platforms with a graphics mode with only 256 colors. Other colors will be dithered to that color palette. Click here for more information on this subject.
  • Terminology
Hue - colour
Saturation - intensity of the colour
Tint - Adding white to a colour
Shade - Adding black to a colour
  • Colour blindness
Take into account 1 in 7 people are colour blind, will
 this affect your final composition?

File Formats

  • GIF...
- Only 256 colours are used within this format.
- Lossless compression, meaning that no colours are lost during the compression process.
- Best for use with graphics with large areas of block colours, and also good for presenting text on a website.
  • JPEG...
- Millions of colours are possible with this format.
- Lossy compression style, the file will lose informatio everytime it is saved. Therefore a file is usually converted into this format once it is complete.
- Good for photos as smooth gradients compress well, not good for sharp edges.
  • PNG (Portable Network Graphic)
- Not all browsers support this format.
- Lossless compression
- Can occasionally be smaller in size than a GIF.
  • TIFF (Tagged Image Format File)
- This is the industry standard format.
- Lossless compression.
- Allows you to save each layer when using photoshop.
  • SVG (Scalable Vector Graphics)
- Can handle animated graphics.
- Uses an XML text file to control the behaviour of the image components. This means that when scaling an image, no quality is lost as the image is recalculated via the XML code at the desired size.
  • EXR (openEXR)
- Open Standard.
- Lossless compression.
- Multi-channel images (specular, diffuse, alpha, normals)